Tantalizing Sour Gummies Recipe You Need To Try Now
JUMP TO RECIPE
Naturally made sour with lemons and tart yellow plums. These Homemade Sour Gummies are zesty and guaranteed to give you a sour kick.

Who Should Eat Sour Gummies?
It makes no difference why you’ve landed at this page. You might want to make gummies for you or your kids, or you might be looking for a way to treat your ongoing reflux.
Many folks benefit from these gummies. They’re healthier than store-bought sour candy, and they’re a lot of fun to make.
Don’t forget to check out my other flavors of gummies here.
Are Sour Gummies Good For You?
Sour gummies are frequently eaten as a treat or snack, but did you know they also have some health benefits? Below are just a couple of their benefits:
Sour Gummies For Digestive Health
Sour Gummies are a great way to get your stomach juices going and increase your stomach acid levels. This, in turn, helps with digestion.
If you’re interested in learning about the effects of low stomach acid, read my article on Struggling with Hiatus Hernia Pain? Completely Cure Your Acid Reflux. It’s incredible to think that 90% of us suffer actually suffer from low stomach acid- and how this causes reflux.
Nutrition
- Calories: 290 Calories
- Protein: ?g
- Fat: ?g
- Carbs: ?g
- Fiber: ?g
- Sugar: ?g
Amounts per serving: 300 Gummies
- Protein 6g 24%
- Carbohydrates 7g 30%
- of Which Sugar is 1g 1%
- Fiber 2g 7%
- Fat 10g 38%


Sour Gummies Recipe
Equipment
- Blender
- juicer
- Gelatin Mold
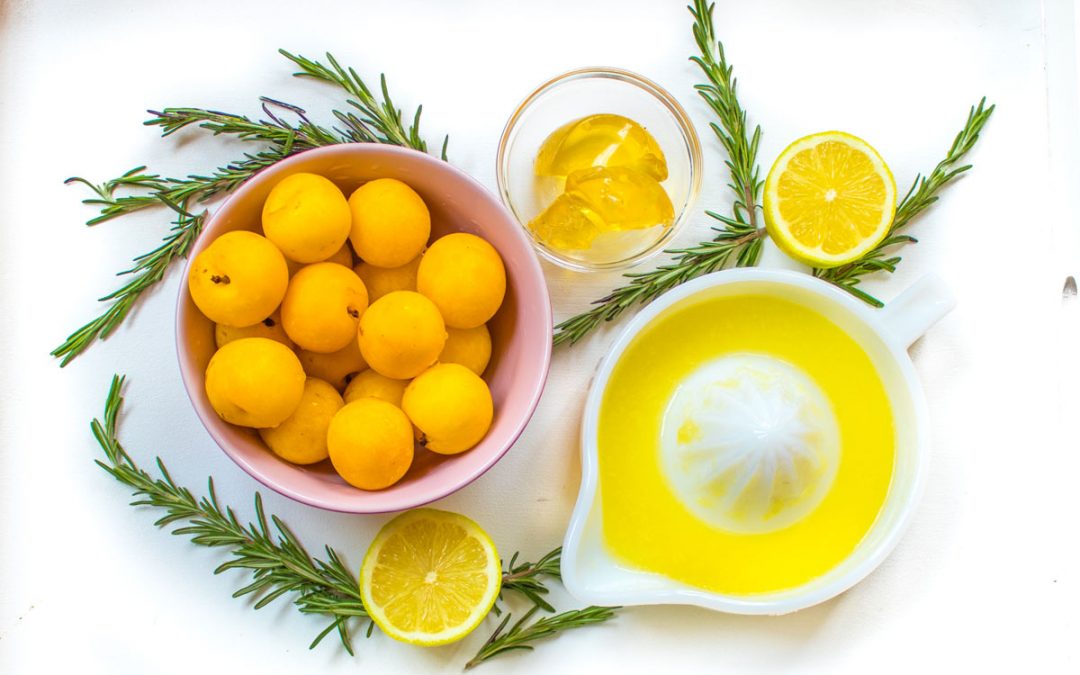
Ingredients
- 3 10g gelatin sachets
- 2 whole lemons
- 2 whole yellow plums
- 2 twigs rosemary
Instructions
- Prepare the GelatinOpen all three sachets of gelatin and place in a bowl and cover with enough water to dissolve, then let it sit for a few minutes so that the gelatin can 'bloom.'

- Prepare the FruitPlace all the ingredients together in a pot (with lid) on the stove and heat on low.

- Combine fruit and GelatinAdd the gelatin to the softened fruit and dissolve in. Stir to break up the fruit.

- Sieve to Remove Unwanted BitsPass the ingredients through a sieve to remove the stones and rosemary, and excess fiber. If the mixture appears too thick, add some water to thin it out.

- Set and StoreLightly grease the silicone mold with coconut oil to ensure gummies don't get stuck or break up when removing from the mold, then fill the silicone mold with the fruit juice blend using the dropper provided. Work quickly before the mixture solidifies (about 2 hours). If you don't let it set long enough, the mold won't release the gummies properly.

What Ingredient Makes Something Sour?
One of the most popular ingredients in sour candy is citric acid, which adds just the right amount of acidic zing.
Citric acid is abundant in citrus fruits like the lemon used in this recipe. They also have high levels of vitamin C, crucial for a functioning immune system.
Are Sour Gummies Bad For You?
Sour gummies have less sugar than most other kinds of candy. On the other hand, there’s a lot of citric acid. When this acid mixes with sugar, it does a lot of damage to your teeth. It wears away the enamel and weakens the structure of your teeth.
Eating store-bought sour gummies can also cause diarrhea and abdominal pains, thanks to the sugar alcohol in them.
Can Citric Acid Burn Your Tongue?
In the same way that citric acid wears away at the enamel of our teeth, it can irritate the soft tissue inside your mouth. It can even eat away at the top layer of our tongue in high enough concentrations. Your tongue may become raw and sensitive.

Will Sour Gummies Make You Gain Weight?
Sour gummies and worms from the store have a lot of added sugar and calories. You could gain weight over time, especially if you eat them a lot and don’t change anything else about your diet. You don’t have to give them up completely, but you should only eat them in small amounts.
These homemade sour gummies don’t have any added sugar and are very low in calories. The natural sugar in the lemon juice and plums is where they get their sugar. Because they have fiber, these gummies are much better for you than those you can buy in stores
Are Sour Gummies Gluten-Free
The gummies will not be gluten-free if they are manufactured with glucose syrup. The majority of store-bought sour gummies are not gluten-free and can include minor quantities of gluten. If you have celiac disease or a severe gluten intolerance, you should avoid eating them.
These gluten-free homemade gummies are created using naturally gluten-free ingredients.
Are Sour Gummies Vegan?
Gelatin, a raw material ingredient made of animal body parts, is commonly used in gummies. Gelatin is most certainly not vegan or vegetarian. Agar agar, a vegan-friendly alternative to gelatin, comes from red algae and can be substituted in its place.