
No Results Found
The page you requested could not be found. Try refining your search, or use the navigation above to locate the post.

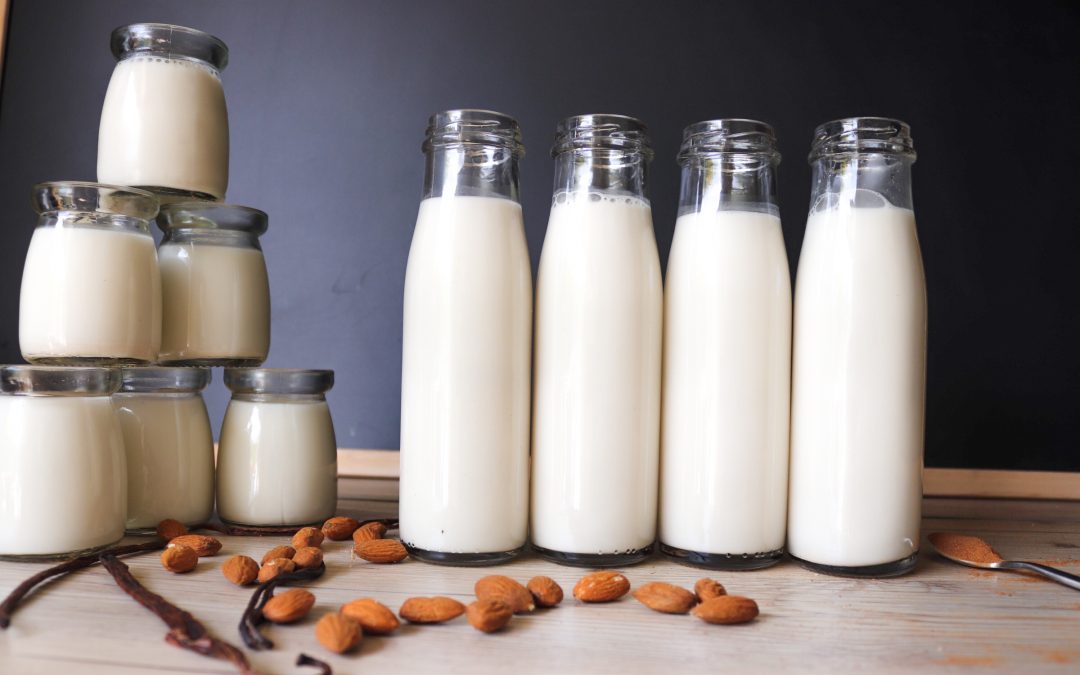
It only takes 5 easy steps to make this fresh, homemade Almond Milk. In a few minutes, you could be sipping away on something life-changing.
Been searching for a cow’s milk alternative? Whether you have trouble digesting lactose or suffer from a milk allergy or maybe you just want delicious tasting milk, I believe almond milk is the best solution. Not only is it delicious but it’s super low in calories, 40 per cup to be exact, compared to the 120 calories per cup of regular milk, it is much lower in carbs and sugar and has a high content of vitamin E, half the daily recommended intake per cup.
I’ve been making and drinking almond milk for years now. I cook and bake with it, put it in oats, smoothies, and my favorite is a creamy almond milk cappuccino, which I have every morning.
Sure you can buy it at the shops in a carton for a hefty price but store-bought versions often have added sweeteners or flavors and even thickening agents like Carrageenan, which comes from seaweed and is linked to inflammation, ulcerative colitis, and diabetes. Trust me… If you think you’ve had almond milk but it was bought from the store in a carton, think again. Once you’ve tasted homemade creamy almond milk you’ll never buy the Regular 2% store-bought ones again!
Growing up I never knew about almond milk or any other alternative to cows milk. I really wish I had.
I remember how badly I’d react when drinking cows milk, especially with my frequent asthma attacks. Tight chested and all that mucus! I remember the first time I ever tried real almond milk. I had just started my paleo diet and went to this strictly vegan restaurant for lunch. When my cappuccino came it looked like the regular frothy type you normally get but the taste was just mind-blowing. I was instantly hooked. The vegan restaurant had one of those really expensive health stores next door so needless to say, I went home that day with everything I needed to make my own milk and other great health treats I’ve probably already shared.

I found these great options through Amazon, if you’re serious about making this milk full-time and other great healthy juices/treats I would seriously consider getting a masticating machine (first two pictures). Other things I do with this nifty machine includes (but not limited too):
Concentrated lemon cubes
Concentrated ginger cubes
Juicing fruits and veggies to drink
Juicing fruits to make my homemade gummies
I always keep a huge supply of almonds at home so it’s necessary to shop around and find the best prices and also the best type of almond. The more elongated, soft-shelled and long-shaped nut (nonpareil) is usually the best for soaking and juicing.
Every one-ounce serving of milk (about 30mls or an estimated 12 almonds) provides 1 gram of protein and 0.7 grams of fiber. Other nutrients found in it include vitamin E, magnesium, riboflavin (vitaminB2), calcium and potassium.
Amounts per serving:

Firstly give the nuts a good rinse under the tap and then soak them in water, in the fridge, for a day or two until they swell up. The nuts soak up the water so keep topping up with more water to ensure they’re always covered. The skins might even start peeling off.
If you absolutely can’t wait to make this milk and 2 days of soaking just won’t do, you can boil the almonds on the stove until they swell up, just be careful not to land up with mush.
Rinse off all the soaking water. If at this point if you’re not sure where we’re going with this, the soft, plump almonds will be blended with just the right amount of water to give a creamy but milky liquid, also known as.. tadaa! Almond milk. So there will be no ‘milking’ of nuts. rather the nuts will become the milk. When blending, the ratio I use is one part almonds to two parts water. you can change that according to how creamy or watery you’d like your milk to be.


It is so much easier with a cold press juicer or as some call it a masticater – I know it sounds like I made that word up. With the masticater, you put the almonds and water down the top shoot, the slow pulverizing ball inside the machine separates most of the almonds fibre from its juices, the addition of the water means a milk comes out the one side of the machine and a dry and fibrey pulp comes out the other. No mess!
If you don’t have one of these machines it’s not a problem. For years I used a normal blender. I’ve only gotten fancy in the last year or two. In a blender, you’d put all your nuts with a bit of water. Blend until you have a fine pulpy looking paste. Keep adding more water and blending until you get the desired consistency and keep tasting until you’re satisfied that it’s creamy in taste but runny enough to become milk. keep going until all the almonds have been chopped up finely.


It’s funny how I’m so fancy with my juicer but still haven’t bought a nut bag for straining out all the fine pulpy bits from the milk. I’ve always used stockings. Now I know what you’re thinking, don’t worry they were never on my legs, I promise.

So if you have a nut bag fine, if not you can buy it through Amazon. As an alternative use the stockings, it’s not ideal because every now and again they burst or form holes.
Pass all your blended mixture through the stocking/bag to remove the pulpy bits from it.
Even though my masticating machine separates the two for me, I still pass the milk through the stocking to remove any finer pieces. The last thing you want is floaty bits in your coffee!
Once you’ve made the milk you’re left with the almond pulp. The pulp is dried out in the oven on low until completely dry and then blended to a fine powder which is, in fact, almond flour (no need to buy that now either). Almond flour has a host of its own wonderful nutritious uses like making health bread, almond flour healthy cookies, crumbed chicken and falafels to name a few.

Now that you have a perfect creamy pulp-free milk you’ll need to choose bottles to store it in. Just like ordinary milk this stuff goes sour after a few days so I freeze mine and Defrost on demand. I freeze little bottles for cappuccinos and the bigger bottles for everything else. They store well in the freezer for weeks!
make sure you use freezer-friendly glass though, I’ve made that mistake before and as a result got these special freezer glass bottles.ips or pieces
Before freezing, you could add different flavors to your milk. I’ve experimented with vanilla essence, vanilla paste from a pod, a pinch of Himalayan salt, cinnamon, flavored syrups and even lavender from the garden. Simply add your flavoring in, shake well and seal the lids. Store all your milk, flavored or not, in the fridge for up to 4 days or in the freezer for up to 4 weeks.
I hope you’ve enjoyed the post and will enjoy the milk as much as I do.


The page you requested could not be found. Try refining your search, or use the navigation above to locate the post.
Don’t be shy. Let us know if you have any questions!
Similar to those found in yogurt, probiotics produced during fermentation are known to have many health benefits including improved digestion, enhanced immune system and better brain function.
Lactic-acid fermentation produces and enhances the levels of enzyme, vitamins and minerals.
Raw vegetables can have E.coli on them but lactic acid produced during fermentation kill off the E.coli bacteria so they can’t survive in the acidic environment of fermentation.
Fermentation breaks down hard-to-digest cellulose.
Fermented foods are not limited to cucumbers but can be made with beetroot, cauliflower, radishes, onions, green beans, asparagus and a seemingly endless variety of other fruits and vegetables.
Pickles you buy in the supermarket have been preserved in vinegar. This guarantees a sour flavor and acts as a preservative. Using vinegar prevents natural fermentation from occurring and results in foods that offer no probiotic benefits.
Foods that we ferment ourselves, using just salt and water, create their own preservative called lactic-acid as a by-product of the fermentation process.
During fermentation, the starches and sugars in the food are converted into lactic acid by the bacteria lactobacilli. This whole process gives fermented foods their unique sour smell and flavor along with making them super nutritious and beneficial for digestion.
By making homemade Pickles we eliminate all the unnecessary fillers, preservatives, sugars and other ingredients with unpronounceable names.
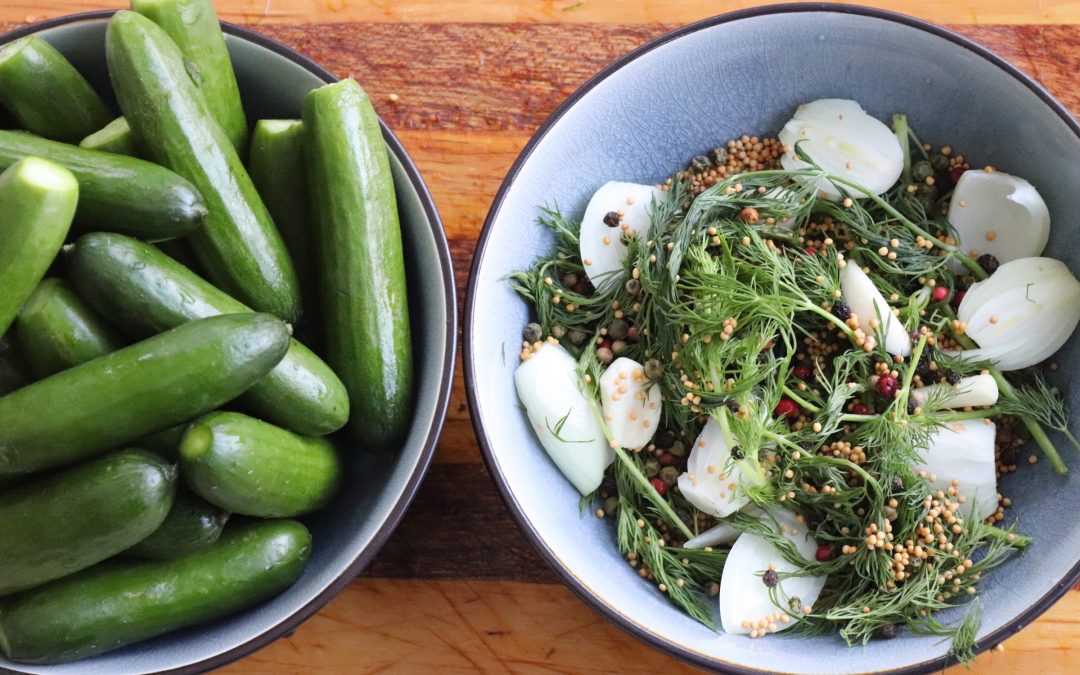
The style of fermenting these cucumber pickles is “brine pickling” where they are kept whole floating in salty brine.
These vegetables do not produce their own brine so you need to mix salt with water to make a brine which is then poured over the vegetables. Fermenting pickles is an anaerobic – without air – process where the vegetables need to be kept submerged in the brine.

Because the vegetables you’re using need to be fully submerged into the brine you’ll need to get the right equipment to make sure this happens. Any part of the mixture not covered in brine will go mushy or decompose and could result in the entire batch being wasted.
Below are some suggestions you can buy online.
Himalayan Pink Salt, Filtered Water, Seasoning: Mustard seeds, Peppercorns,
The recipe will make approximately one large jar of pickles
Per serving (3 pickles)
3g Carbs
0.5g Fibre
1.9g Protein
20 Calories per serving
Amounts per serving:

Chill the baby cucumbrs in ice water for about 15 minutes to clean and firm them up.

Trim off the stems and thinly slice off the blossom ends of the cucumbers.
Blossoms contain an enzyme that will soften your pickles which means leaving them on could result in mushy pickles.

Prepare all the other ingredients by removing the shell from the garlic cloves and chopping up the dill or any other herbs used.

Make the brine solution by adding the salt to the water and stirring well until completely dissolved.

Place the baby cucumbers and all the other ingredients in the jar and try distribute everything evenly, then seal the lid tightly and let it sit for two or three days like this.

Tannins help strengthen the pectins in the cucumbers and keep pickles crispy so add black tea or bay leaves at the end before sealing the lid to ensure crunchy, mush-free pickles.


Celery and apples are two of the most common and easily accessible fruits and vegetables in the market. They are not only delicious but also incredibly nutritious. These two simple ingredients can be combined to create a delicious and healthy...

These are the best detox water recipes for weight loss, aiding digestion, cleansing the body and looking dang great at parties! Cucumber and lemon detox water Mango and Thyme Strawberry and mint Basil and raspberries. Grapefruit and Rosemary Apple cider and...

Naturally made sour with lemons and tart yellow plums. These Homemade Sour Gummies are zesty and guaranteed to give you a sour kick.Who Should Eat Sour Gummies? It makes no difference why you've landed at this page. You might want to make gummies for you or...

My mind exploded the day I discovered how to make microwave popcorn from scratch! Popcorn is one of my top ten favorite foods. I've been making popcorn on the stove for years, but this way is cleaner, simpler, and healthier. It's one of the healthiest snacks you can...

Should you, or should you not, exercise on vacation? My Goal for You: is to be fit, healthy, and happy on vacation or while traveling. In some situations, this means taking a break from exercise. Whether you should or shouldn't exercise, I will prove how a...

Is detox water truly supplying a slew of health benefits? It's a topic that's gotten a lot of attention. Is it the water itself that is so beneficial?1. What Are Detox Waters? Chopped up pieces of fruit, vegetables, or herbs are put into water for a certain...